Extending GoDiagram
GoDiagram can be extended in a variety of ways. The most common way to change the standard behavior is to set properties on the GraphObject, Diagram, CommandHandler, Tool, or Layout. But when no such properties exist, you might need to override methods of CommandHandler, Tool, Layout, Link, or Node. Methods that you can override are documented in the API reference. This page describes how to override methods by defining a subclass.
Note that the API for extension classes may change with any version, even point releases. If you intend to use an extension in production, you should copy the code to your own source directory.
In addition to our samples, GoDiagram provides an extensions gallery, showcasing the creation of custom tools and layouts. We recommend that you copy the files that you need into your project, so that you can adjust how they refer to the library and so that you can include them into your own building and packaging procedures.
Command Handler
Overriding the CommandHandler allows you to alter default functionality and create your own key bindings. See the intro page on Commands for more. However, the techniques shown below for overriding methods on Tools and Layouts also applies to the CommandHandler.
Tools and Layouts
GoDiagram operates on nodes and links using many tools and layouts, all of which are subclasses of the Tool and Layout classes. See the intro page on Tools for more about Tools, and the intro page on Layouts for more about Layouts.
Tools can be modified, or they can be replaced in or added to the Diagram.ToolManager. All tools must inherit from the Tool class or from a class that inherits from Tool.
Some of our samples, such as the Pipes sample, contain examples of custom tools. More custom tool examples are available in the extensions gallery.
Layouts can be modified, or they can be used by setting Diagram.Layout or Group.Layout. All Layouts must inherit from the Layout class or a class that inherits from Layout.
Some of our samples, such as the Parse Tree sample, contain examples of custom layouts. More custom layout examples are available in the extensions gallery.
Overriding Methods by Subclassing
Subclassing Tools
Tools can be subclassed to create custom Tools that inherit the properties and methods of an existing tool.
To customize a Tool, we would start with the following scaffolding:
  public class CustomClickSelectingTool : ClickSelectingTool {
    public override void StandardMouseSelect() {
      // Maybe do something else before
      // ...

      // In cases where you want normal behavior, call the base functionality.
      base.StandardMouseSelect();

      // Maybe do something else after
      // ...
    }
  }
As a concrete example, we will override Tool.StandardMouseSelect to select only Nodes and Links that have a width and height of less than 50 diagram
units. This means that we must find the to-be-selected object using diagram.FindPartAt, check its bounds, and quit if the bounds are too large.
Otherwise, we call the base functionality to select as we normally might.
  public class CustomClickSelectingTool : ClickSelectingTool {
    public override void StandardMouseSelect() {
      var e = Diagram.LastInput;
      // to select containing Group if Part.CanSelect() is false
      var curobj = Diagram.FindPartAt(e.DocumentPoint, false);
      if (curobj != null) {
        var bounds = curobj.ActualBounds;
        // End the selection process if the bounds are greater than 50 width or height
        if (bounds.Width > 50 || bounds.Height > 50) {
          // If this was a left click with no modifier, we want to act the same as if
          // we are clicking on the Diagram background, so we clear the selection
          if (e.Left && !e.Control && !e.Shift) {
            Diagram.ClearSelection();
          }
          // Then return, so that we do not call the base functionality
          return;
        }
      }
      // otherwise, call the base functionality
      base.StandardMouseSelect();
    }
  }

  // Regular diagram setup:
  private void Setup() {
    diagram.ToolManager.ClickSelectingTool = new CustomClickSelectingTool();

    diagram.NodeTemplate =
      new Node("Auto")
        .Add(
          new Shape { Fill = "white" }
            .Bind("Fill", "Color"),
          new TextBlock { Margin = 5 }
            .Bind("Text", "Key")
        );

    diagram.Model =
      new MyModel {
        NodeDataSource = new List<NodeData> {
          new NodeData { Key = "Alpha", Color = "lightblue" },
          new NodeData { Key = "Epsilon", Color = "thistle" },
          new NodeData { Key = "Psi", Color = "lightcoral" },
          new NodeData { Key = "Gamma", Color = "lightgreen" }
        }
      };
  }
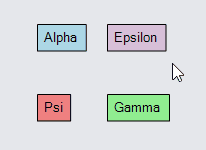
Running this code, we see that the "Epsilon" and "Gamma" nodes are not selectable, because they are both wider than 50. Note that this custom tool does not change the behavior of other tools that might select, such as the DraggingTool or the DragSelectingTool.
Subclassing Layouts
Layouts can be subclassed to create custom Layouts that inherit the properties and methods of an existing layout.
To create a new Layout, called CascadeLayout, we would start with the following scaffolding:
  public class CascadeLayout : Layout {
    // new fields get declared and initialized here

    public CascadeLayout() : base() {
      // other initializations can be done here
    }

    // optionally, define property getters and setters here

    // override or define methods
    public override void DoLayout(IEnumerable<Part> coll = null) {
      // always be sure to collect the parts to be laid out
      HashSet<Part> allparts;
      if (coll != null) {
        allparts = CollectParts(coll);
      } else if (Group != null) {
        allparts = CollectParts(Group);
      } else if (Diagram != null) {
        allparts = CollectParts(Diagram);
      } else {
        return; // Nothing to layout!
      }

      // Layout logic goes here.
    }
  }
Layouts commonly need additional properties that act as layout options. To add a "offset" property to CascadeLayout, we will use the convention
that an underscore member is private, and will set a default value in the constructor:
  public class CascadeLayout : Layout {
    private Size _Offset = new Size(12, 12);

    ...
  }
Then, we make a public getter and setter. Getters and setters allow us to have side effects. This setter invalidates the layout only if the value has changed.
  public Size Offset {
    get { return _Offset; }
    set {
      if (_Offset != value) {
        _Offset = value;
        InvalidateLayout();
      }
    }
  }
If the layout might be used as the value of Group.Layout, you will need to make sure the instance that you set in the Group template can be copied correctly.
  protected override void CloneProtected(Layout c) {
    if (c == null) return;

    base.CloneProtected(c);
    var copy = (CascadeLayout)c;
    copy._Offset = _Offset;
  }
Lastly we'll define a Layout.DoLayout, being sure to look at the documentation and accomodate all possible input..
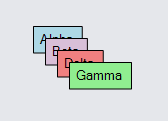
All together, we can see the cascade layout in action:
  /// <summary>
  /// This layout arranges nodes in a cascade specified by the Offset property.
  /// </summary>
  public class CascadeLayout : Layout {
    private Size _Offset = new Size(12, 12);

    public CascadeLayout() : base() { }

    public Size Offset {
      get { return _Offset; }
      set {
        if (_Offset != value) {
          _Offset = value;
          InvalidateLayout();
        }
      }
    }

    protected override void CloneProtected(Layout c) {
      if (c == null) return;

      base.CloneProtected(c);
      var copy = (CascadeLayout)c;
      copy._Offset = _Offset;
    }

    public override void DoLayout(IEnumerable<Part> coll = null) {
      // always be sure to collect the parts to be laid out
      HashSet<Part> allparts;
      if (coll != null) {
        allparts = CollectParts(coll);
      } else if (Group != null) {
        allparts = CollectParts(Group);
      } else if (Diagram != null) {
        allparts = CollectParts(Diagram);
      } else {
        return; // Nothing to layout!
      }

      // Start the layout at the arrangement origin, a property inherited from Layout
      var x = ArrangementOrigin.X;
      var y = ArrangementOrigin.Y;
      var offset = Offset;

      foreach (var p in allparts) {
        if (!(p is Node node)) continue;  // ignore Links
        node.Move(new Point(x, y));
        x += offset.Width;
        y += offset.Height;
      }
    }
  }

  // Regular diagram setup:
  private void Setup() {
    diagram.Layout = new CascadeLayout();

    diagram.NodeTemplate =
      new Node("Auto")
        .Add(
          new Shape { Fill = "white" }
            .Bind("Fill", "Color"),
          new TextBlock { Margin = 5 }
            .Bind("Text", "Key")
        );

    diagram.Model =
      new MyModel {
        NodeDataSource = new List<NodeData> {
          new NodeData { Key = "Alpha", Color = "lightblue" },
          new NodeData { Key = "Beta", Color = "thistle" },
          new NodeData { Key = "Delta", Color = "lightcoral" },
          new NodeData { Key = "Gamma", Color = "lightgreen" }
        }
      };
  }
CommandHandler, Tool, Link, and Node can all be subclasses as well. For examples, see extension source code.