Panel Item Lists
How does one display a variable number of elements in a node by data binding to a list? The answer is simple: just bind (or set) Panel.ItemList. The Panel will contain as many elements as there are values in the bound list.
See samples that make use of item lists in the samples index.
Simple item lists
Here is a very simple example demonstrating the standard way of binding Panel.ItemList to a data property whose value is a list.
  diagram.NodeTemplate =
    new Node("Vertical")
      .Bind("ItemList", "Items");

  diagram.Model =
    new MyModel {
      NodeDataSource = new List<NodeData> {
        new NodeData { Key = 1, Items = new() { "Alpha", "Beta", "Gamma", "Delta" } },
        new NodeData { Key = 2, Items = new() { "first", "second", "third" } }
      },
      LinkDataSource = new List<LinkData> {
        new LinkData { From = 1, To = 2 }
      }
    };
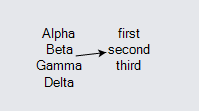
Note that the Panel.ItemList property is almost always bound to some data property that always has a list as its value. One does not use a literal or constructed list as the initial value for the Panel.ItemList property in a template, unless you expect all parts copied from the template will always have exactly the same unchanging list of items.
As with most data bindings, the name of the data property does not really matter. In this example, the property name is "Items", but you can use whatever name seems appropriate to your app. You can also have more than one item list in a node or link.
Item templates
You can customize the elements created for each array item by specifying the Panel.ItemTemplate. The template must be an instance of Panel. Each item in the bound list will get a copy of this Panel that is added to the Panel with the Panel.ItemList. The Panel.Data will be the item in the list, so all of the normal data binding functionality is available to customize each item Panel.
This use of templates and data binding is similar to the way Nodes are created automatically in a Diagram based on an enumerable of node data in the model. The value of Diagram.NodeTemplate must always be a Node or a simple Part; the value of Panel.ItemTemplate must always be a Panel and cannot be a Part.
Note that each item in the Panel.ItemList can be any value, including strings and numbers. This is different than the values held by the Model.NodeDataSource, which must all be of the given generic object type. The item Panel.Data value may be a string, as it is in this example; the Panel.Data value will always be an object.
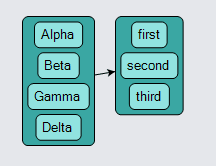
Here is a simple customization of the Panel.ItemTemplate, working with the same model as above. Note that the second argument to the Binding constructor in this case is the empty string, because strings (and numbers) do not have many useful properties.
  diagram.NodeTemplate =
    new Node("Auto")
      .Add(
        new Shape("RoundedRectangle") { Fill = "#3AA7A3" },
        new Panel("Vertical") {
            ItemTemplate =
              new Panel("Auto") { Margin = 2 }
                .Add(
                  new Shape("RoundedRectangle") { Fill = "#91E3E0" },
                  new TextBlock() { Margin = 2 }
                    .Bind("Text", "")
                )  // end of ItemTemplate
          }
          .Bind("ItemList", "Items")
      );

  diagram.Model =
    new MyModel {
      NodeDataSource = new List<NodeData> {
        new NodeData { Key = 1, Items = new() { "Alpha", "Beta", "Gamma", "Delta" } },
        new NodeData { Key = 2, Items = new() { "first", "second", "third" } }
      },
      LinkDataSource = new List<LinkData> {
        new LinkData { From = 1, To = 2 }
      }
    };
However even when binding to strings or numbers one could make the use of converters to get the desired binding values.
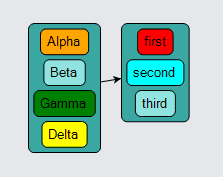
Of course if the array items are objects, you can refer to their properties just as you can in a Diagram.NodeTemplate. As with node data, you can have as many properties on your item data as your app demands, using whatever property names you prefer. Use data binding to automatically use those property values to customize the appearance and behavior of your item Panels.
  diagram.NodeTemplate =
    new Node("Auto")
      .Add(
        new Shape("RoundedRectangle") { Fill = "#3AA7A3" },
        new Panel("Vertical") {
            ItemTemplate =
              new Panel("Auto") { Margin = 2 }
                .Add(
                  new Shape("RoundedRectangle") { Fill = "#91E3E0" }
                    .Bind("Fill", "C"),
                  new TextBlock() { Margin = 2 }
                    .Bind("Text", "T")
                )
          }
          .Bind("ItemList", "Items")
      );

  diagram.Model =
    new MyModel {
      NodeDataSource = new List<NodeData> {
        new NodeData {
          Key = 1,
          Items = new() {
            new() { T = "Alpha", C = "orange" },
            new() { T = "Beta" },
            new() { T = "Gamma", C = "green" },
            new() { T = "Delta", C = "yellow" }
          }
        },
        new NodeData {
          Key = 2,
          Items = new() {
            new() { T = "first", C = "red" },
            new() { T = "second", C = "cyan" },
            new() { T = "third" }
          }
        }
      },
      LinkDataSource = new List<LinkData> {
        new LinkData { From = 1, To = 2 }
      }
    };
Different Panel types
Although Panels that have an item list are often of type PanelLayoutVertical, you can use other panel types that support a variable number of elements. The most common types are PanelLayoutVertical, PanelLayoutHorizontal, PanelLayoutTable, and PanelLayoutPosition. It does not make sense to use a PanelLayoutViewbox panel, because that panel type only supports a single element.
If the panel type is PanelLayoutSpot, PanelLayoutAuto, or PanelLayoutLink, the first child element of the Panel is assumed to be the "main" object and is kept as the first child in addition to all of the nested panels created for the values in the Panel.ItemList.
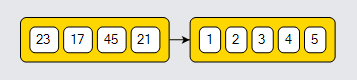
Here is an example of a horizontal Panel:
  diagram.NodeTemplate =
    new Node("Auto")
      .Add(
        new Shape("RoundedRectangle") { Fill = "gold" },
        new Panel("Horizontal") {
            Margin = 4,
            ItemTemplate =
              new Panel("Auto") { Margin = 2 }
                .Add(
                  new Shape("RoundedRectangle") { Fill = "white" },
                  new TextBlock() { Margin = 2 }
                    // values are ints, use ToString
                    .Bind("Text", "", v => v.ToString())
                )
          }
          .Bind("ItemList", "A")
      );

  diagram.Model =
    new MyModel {
      NodeDataSource = new List<NodeData> {
        new NodeData { Key = 1, A = new() { 23, 17, 45, 21 } },
        new NodeData { Key = 2, A = new() { 1, 2, 3, 4, 5 } }
      },
      LinkDataSource = new List<LinkData> {
        new LinkData { From = 1, To = 2 }
      }
    };
When using a Panel of type PanelLayoutTable as the container, it is commonplace to use an item template that is of type PanelLayoutTableRow or PanelLayoutTableColumn. This is the only way to specify the individual column or row indexes for the elements inside the template.
  diagram.NodeTemplate =
    new Node("Auto")
      .Add(
        new Shape() { Fill = "lightgray" },
        new Panel("Table") {
            Margin = 4, DefaultAlignment = Spot.Left,
            ItemTemplate =
              new Panel("TableRow")
                .Bind("Background", "Back")
                .Add(
                  new TextBlock { Column = 0, Margin = 2, Font = new Font("Segoe UI", 13, FontWeight.Bold) }
                    .Bind("Text", "Name"),
                  new TextBlock { Column = 1, Margin = 2 }
                    .Bind("Text", "Phone"),
                  new TextBlock { Column = 2, Margin = 2 }
                    .Bind("Text", "Loc")
                )
          }
          .Bind("ItemList", "People")
      );

  diagram.Model =
    new MyModel {
      NodeDataSource = new List<NodeData> {
        new NodeData {
          Key = 1,
          People = new() {
            new () { Name = "Alice", Phone = "2345", Loc = "C4-E18" },
            new () { Name = "Bob", Phone = "9876", Loc = "E1-B34", Back = "red" },
            new () { Name = "Carol", Phone = "1111", Loc = "C4-E23" },
            new () { Name = "Ted", Phone = "2222", Loc = "C4-E197" }
          }
        },
        new NodeData {
          Key = 2,
          People = new() {
            new () { Name = "Robert", Phone = "5656", Loc = "B1-A27" },
            new () { Name = "Natalie", Phone = "5698", Loc = "B1-B6" }
          }
        }
      },
      LinkDataSource = new List<LinkData> {
        new LinkData { From = 1, To = 2 }
      }
    };
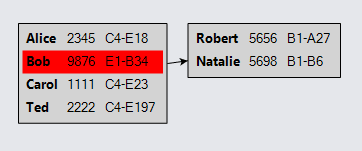
Note in this case the item template has a data binding of the TableRow Panel's GraphObject.Background property to the item data's "Back" property.
Sometimes one wants to get the row for a particular item, or one wants to have a property value depend on the row index. You can always depend on the value of Panel.ItemIndex to get that property. If the item Panel is of type PanelLayoutTableRow, the item Panel's GraphObject.Row property will also be set to the zero-based row number, so you can access it in code by finding that Panel. The same is true for GraphObject.Column if the ItemTemplate is a PanelLayoutTableColumn Panel.
Because that property is set when the item panels are created for list item data, you can create Bindings where the source is that "Row" property:
.BindElement("TargetProperty", "Row", i => ...). The following example demonstrates binding the Panel.Background property to be light green if
the row is even.
  diagram.NodeTemplate =
    new Node("Auto")
      .Add(
        new Shape() { Fill = "white" },
        new Panel("Table") {
            DefaultAlignment = Spot.Left,
            ItemTemplate =
              new Panel("TableRow")
                .BindElement("Background", "Row",
                                  i => (int)i%2 == 0 ? "lightgreen": "transparent")
                .Add(
                  new TextBlock { Column = 0, Margin = 2, Font = new Font("Segoe UI", 13, FontWeight.Bold) }
                    .Bind("Text", "Name"),
                  new TextBlock { Column = 1, Margin = 2 }
                    .Bind("Text", "Phone"),
                  new TextBlock { Column = 2, Margin = 2 }
                    .Bind("Text", "Loc"),
                  Builder.Make<Panel>("Button")
                    .Set(new {
                      Column = 3,
                      Margin = new Margin(0, 1, 0, 0),
                      Click = new Action<InputEvent, GraphObject>((e, obj) => {
                        // obj is this Button Panel;
                        // find the TableRow Panel containing it
                        var itempanel = obj.Panel;
                        var data = itempanel.Data as Person;
                        Console.WriteLine("Clicked on row " + itempanel.Row + " for " + data.Name);
                      })
                    })
                    .Add(new Shape("Diamond") { DesiredSize = new Size(8, 8) })
                )
          }
          .Bind("ItemList", "People")
      );

  diagram.Model =
    new MyModel {
      NodeDataSource = new List<NodeData> {
        new NodeData {
          Key = 1,
          People = new() {
            new () { Name = "Alice", Phone = "2345", Loc = "C4-E18" },
            new () { Name = "Bob", Phone = "9876", Loc = "E1-B34", Back = "red" },
            new () { Name = "Carol", Phone = "1111", Loc = "C4-E23" },
            new () { Name = "Ted", Phone = "2222", Loc = "C4-E197" },
            new () { Name = "Robert", Phone = "5656", Loc = "B1-A27" },
            new () { Name = "Natalie", Phone = "5698", Loc = "B1-B6" }
          }
        }
      }
    };
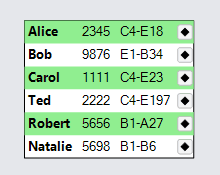
The "Button" Panel in the item template also demonstrates how one can get the particular row index as well as the data to which the item panel is bound.
The natural way to have a distinct header for a Table Panel is to have the first row (i.e. the first item) hold the data for the header, but have it be styled differently. If you want such a behavior, you will want to use multiple templates -- see the example in Template Maps.
If instead you want to have a table header that is "fixed" and not dependent on item list data, you can have a single "TableRow" (or "TableColumn") Panel in the "Table" Panel that is kept if GraphObject.IsPanelMain is true.
  diagram.NodeTemplate =
    new Node("Auto")
      .Add(
        new Shape() { Fill = "white" },
        new Panel("Table") {
            DefaultAlignment = Spot.Left,
            DefaultColumnSeparatorStroke = "black",
            ItemTemplate =  // the row created for each item in the ItemList
              new Panel("TableRow")
                .Add(
                  new TextBlock { Column = 0, Margin = 2, Font = new Font("Segoe UI", 13, FontWeight.Bold) }
                    .Bind("Text", "Name"),
                  new TextBlock { Column = 1, Margin = 2 }
                    .Bind("Text", "Phone"),
                  new TextBlock { Column = 2, Margin = 2 }
                    .Bind("Text", "Loc")
                )
          }
          .Bind("ItemList", "People")
          .Add(
            // define the header as a literal row in the table,
            // not bound to any item, but bound to Node data
            new Panel("TableRow")
              { IsPanelMain = true }  // needed to keep this element when ItemList gets an Array
              .Add(
                new TextBlock("Person") {
                  Column = 0, Margin = new Margin(2, 2, 0, 2),
                  Font = new Font("Segoe UI", 13, FontWeight.Bold)
                },
                new TextBlock("Phone") {
                  Column = 1, Margin = new Margin(2, 2, 0, 2),
                  Font = new Font("Segoe UI", 13, FontWeight.Bold)
                },
                new TextBlock("Location") {
                  Column = 2, Margin = new Margin(2, 2, 0, 2),
                  Font = new Font("Segoe UI", 13, FontWeight.Bold)
                }
              )
          )
          .Add(
            new RowDefinition { Row = 0, Background = "lightgray" },
            new RowDefinition { Row = 1, SeparatorStroke = "black" }
          )
      );

  diagram.Model =
    new MyModel {
      NodeDataSource = new List<NodeData> {
        new NodeData {
          Key = 1,
          People = new() {
            new () { Name = "Alice", Phone = "2345", Loc = "C4-E18" },
            new () { Name = "Bob", Phone = "9876", Loc = "E1-B34", Back = "red" },
            new () { Name = "Carol", Phone = "1111", Loc = "C4-E23" },
            new () { Name = "Ted", Phone = "2222", Loc = "C4-E197" },
            new () { Name = "Robert", Phone = "5656", Loc = "B1-A27" },
            new () { Name = "Natalie", Phone = "5698", Loc = "B1-B6" }
          }
        }
      }
    };
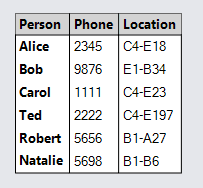
In such cases the constant header element, the literal "TableRow" Panel in the node template, will have a GraphObject.Row == 0 and a
Panel.ItemIndex that is -1. The "TableRow" Panel corresponding to the first item data, panel.ItemList[0], will have a
GraphObject.Row == 1, matching its position in the list of Panel.Elements. But it will have a Panel.ItemIndex == 0, matching its position
in the ItemList.
Arrays in Models
When a data-bound Part is copied, the Part's Panel.Data, which must be an object, is copied too. The normal copying method, Model.CopyNodeData, will try calling the Clone method on the object, which may be a simple shallow copy.
However that is probably not the desired behavior for lists. When you use item lists, you normally do not want to share those lists between copies of the Node. If your node data is not copied correctly, unexpected behavior may occur. So when you are using item lists and permit users to copy nodes, you will need to make sure such lists and their objects are copied. You may want to implement your own node data copier function and assign it to Model.CopyNodeDataFunction or implement a sensible clone method on your node data class.
This is demonstrated by the Dynamic Ports sample, which not only needs to copy the four item lists that each node data holds, but also each object that is in each of those lists.
For GraphLinksModels, there are also a similar members for link data: the GraphLinksModel.CopyLinkData method and GraphLinksModel.CopyLinkDataFunction property.
If you need to dynamically modify the value of a property of an item data, call Model.Set, just as you would for node data or link data.
If you need to add or remove items from an item list, call the Model.InsertListItem or Model.RemoveListItem methods.