Introduction to GoDiagram Diagramming Components
GoDiagram is a .NET library that lets you easily create interactive diagrams. GoDiagram supports graphical templates and data-binding of graphical object properties to model data. You only need to save and restore the model, consisting of simple objects holding whatever properties your app needs. Many predefined tools and commands implement the standard behaviors that most diagrams need. Customization of appearance and behavior is mostly a matter of setting properties.
A Simple GoDiagram Diagram
The following code defines a node template and model data, which produces a small diagram with a handful of nodes and links.
private Diagram diagram;
public Basics() {
InitializeComponent();
diagram = diagramControl1.Diagram;
Setup();
}
private void Setup() {
// enable Ctrl-Z to undo and Ctrl-Y to redo
diagram.UndoManager.IsEnabled = true;
// the node template describes how each Node should be constructed
diagram.NodeTemplate =
new Node("Auto") // the Shape automatically fits around the TextBlock
.Add(
new Shape("RoundedRectangle") // use this kind of figure for the Shape
.Bind("Fill", "Color"),
new TextBlock { Margin = 3 } // some room around the text
.Bind("Text", "Key")
);
// the Model holds only the essential information describing the diagram
diagram.Model = new MyModel {
// a list of node data objects, one per node
NodeDataSource = new List<NodeData> {
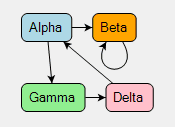
new NodeData { Key = "Alpha", Color = "lightblue" },
new NodeData { Key = "Beta", Color = "orange" },
new NodeData { Key = "Gamma", Color = "lightgreen" },
new NodeData { Key = "Delta", Color = "pink" }
},
// a list of link data objects, one per link
LinkDataSource = new List<LinkData> {
new LinkData { From = "Alpha", To = "Beta" },
new LinkData { From = "Alpha", To = "Gamma" },
new LinkData { From = "Beta", To = "Beta" },
new LinkData { From = "Gamma", To = "Delta" },
new LinkData { From = "Delta", To = "Alpha" }
}
};
}
// define the model data
public class MyModel : GraphLinksModel<NodeData, string, object, LinkData, string, string> { }
public class NodeData : MyModel.NodeData {
public string Color { get; set; }
}
public class LinkData : MyModel.LinkData { }
This creates the following Diagram:
You can interact with this diagram in many ways:
- You can select a part by clicking on it. Selected nodes are highlighted with an Adornment that is a blue rectangle surrounding the node. Selected links are highlighted with a blue line following the path of the link.
- Multiple parts may be selected at once. Hold the Shift key down when clicking to add to the selection. Hold the Control key down when clicking to toggle whether that part is selected.
- Another way to multi-select is to mouse-down at a point in the background (not on a part), wait a moment, and then drag a box. Parts that are in the box when the mouse-up occurs are selected. The Shift and Control modifiers work then as well.
- Ctrl-A selects all parts in the diagram.
- Move one or more nodes by selecting them and dragging.
- Copying selected parts works with either copy/paste (Ctrl-C/Ctrl-V) or with Ctrl-mouse-drag.
- Delete selected parts with the Delete key.
- If scrollbars are visible or if the whole collection of parts is smaller than the viewable area of the diagram (the "viewport"), you can pan the diagram with a mouse-down in the background (not on a part) if you drag without waiting.
- Use the mouse wheel to scroll up and down and Shift-mouse-wheel to scroll left and right. Ctrl-mouse-wheel zooms in and out.
You can also pan, pinch zoom, select, copy, move, delete, undo, and redo with your fingers on a touch device. Most commands that can be invoked from a keyboard can be invoked from the default context menu that you get by pressing your finger and holding it motionless for a moment.
If you'd like to see more examples of what GoDiagram can do, see the GoDiagram Samples directory. To make it easier to search the code and documentation or to experiment by modifying the samples, you can install the GoDiagram kit in various manners:
- Download a kit from Download.
- Download samples from GoDiagram on GitHub.
GoDiagram Concepts
Diagrams consist of Parts: Nodes that may be connected by Links and that may be grouped together into Groups. All of these parts are gathered together in Layers and are arranged by Layouts.
Each diagram has a Model that holds and interprets your application data to determine node-to-node link relationships and group-member relationships. Most parts are data-bound to your application data. The diagram automatically creates a Node or a Group for each data item in the model's Model.NodeDataSource and a Link for each data item in the model's GraphLinksModel.LinkDataSource. You can add whatever properties you need to each data object, but there are just a few properties that each kind of model expects.
Each Node or Link is normally defined by a template that declares its appearance and behavior. Each template consists of Panels of GraphObjects such as TextBlocks or Shapes. There are default templates for all parts, but almost all applications will specify custom templates in order to achieve the desired appearance and behavior. Data bindings of GraphObject properties to model data properties make each Node or Link unique for the data.
The nodes may be positioned manually (interactively or programmatically) or may be arranged automatically by the Diagram.Layout and by each Group.Layout. Nodes are positioned either by their top-left corner point (GraphObject.Position) or by a programmer-defined spot in the node (Part.Location and Part.LocationSpot).
Tools handle mouse and keyboard events. Each diagram has a number of tools that perform interactive tasks such as selecting parts or dragging them or drawing a new link between two nodes. The ToolManager determines which tool should be running, depending on the mouse events and current circumstances.
Each diagram also has a CommandHandler that implements various commands, such as Delete or Copy. The CommandHandler interprets keyboard events, such as control-Z, when the ToolManager is running.
The diagram provides the ability to scroll the parts of the diagram and to zoom in or out. The diagram also contains all of the layers, which in turn contain all of the parts (nodes and links). The parts in turn are composed of possibly nested panels of text, shapes, and images. This hierarchy of objects in memory forms the "visual tree" of everything that may be drawn by the diagram.
The Overview class allows the user to see the whole model and to control what part of it that the diagram displays. The Palette class holds parts that the user may drag-and-drop into a diagram.
You can select one or more parts in the diagram. The template implementation may change the appearance of the node or link when it is selected. The diagram may also add Adornments to indicate selection and to support tools such as resizing a node or reconnecting a link. Adornments are also how tooltips and context menus are implemented.
All programmatic changes to Diagram, GraphObject, Model or model data state should be performed within a single transaction per user action, to make sure updating happens correctly and to support undo/redo. All of the predefined tools and commands perform transactions, so each user action is automatically undoable if the UndoManager is enabled. DiagramEvents on Diagrams, and event handlers on Diagrams and GraphObjects, are all documented whether they are raised within a transaction or whether you need to conduct a transaction in order to change the model or the diagram.
Creating a Diagram
GoDiagram does not depend on any library or framework, so you should be able to use it in any environment. However it does require that the environment support your platform of choice.
Including GoDiagram
Before you can execute any C# code to build a Diagram, you will need to include the GoDiagram library either via package reference or DLL and import the namespaces you'll be using.
<PackageReference Include="Northwoods.GoDiagram.WinForms" Version="x.y.z" />
    <Reference Include="Northwoods.GoDiagram.WinForms">
      <HintPath>path\to\Northwoods.GoDiagram.WinForms.dll</HintPath>
    </Reference>
    using Northwoods.Go;
    using Northwoods.Go.Models;
    // using Northwoods.Go.Layouts;
    // using Northwoods.Go.Tools;
During development we recommend that you set the debug flag for additional run-time error checking and debugging ability.
Hosting GoDiagram in a component
Every Diagram must be hosted by some visual component, depending on the platform. GoDiagram will manage the contents of that component, but you may position and size and style the component.
    private void InitializeComponent() {
      this.diagramControl1 = new Northwoods.Go.WinForms.DiagramControl();
      this.SuspendLayout();
      //
      // diagramControl1
      //
      this.diagramControl1.AllowDrop = true;
      this.diagramControl1.Location = new System.Drawing.Point(0, 0);
      this.diagramControl1.Margin = new System.Windows.Forms.Padding(0);
      this.diagramControl1.Name = "diagramControl1";
      this.diagramControl1.Size = new System.Drawing.Size(400, 150);
      this.diagramControl1.TabIndex = 0;
      this.diagramControl1.Text = "diagramControl1";
      //
      // Basics
      //
      this.AutoScaleDimensions = new System.Drawing.SizeF(7F, 15F);
      this.AutoScaleMode = System.Windows.Forms.AutoScaleMode.Font;
      this.AutoSize = true;
      this.Controls.Add(this.diagramControl1);
      this.Margin = new System.Windows.Forms.Padding(0);
      this.Name = "Basics";
      this.Size = new System.Drawing.Size(400, 150);
      this.ResumeLayout(false);

    }

    private Northwoods.Go.WinForms.DiagramControl diagramControl1;
Then you can create the Diagram in C# with a reference to that component. Build the diagram by constructing data objects and adding them to the diagram's model.
    private Diagram diagram;

    public Basics() {
      InitializeComponent();

      // access the diagram associated with the control
      diagram = diagramControl1.Diagram;
      // setup the diagram once the control has rendered
      Setup();
    }

    private void Setup() {
      diagram.Model = new MyModel {
        NodeDataSource = new List<NodeData> {
          new NodeData { Key = "Hello" },  // two node data, in a list
          new NodeData { Key = "World!" }
        },
        LinkDataSource = new List<LinkData> {
          new LinkData { From = "Hello", To = "World!" }  // one link data, in a list
        }
      };
    }

    // define the model data
    public class MyModel : GraphLinksModel<NodeData, string, object, LinkData, string, string> { }
    public class NodeData : MyModel.NodeData { }
    public class LinkData : MyModel.LinkData { }

This completes the implementation of the "Hello World!" diagram that you see above.
Developing your Diagram
GoDiagram outputs error or warning messages when something goes wrong. When developing with GoDiagram, be sure to check your output for information. The "debug mode" of the library contains extra type-checking and error-checking code, and should be used during development. The standard mode has less error checking, but is faster as a result, and should be used in production.
To learn about new features and bug fixes, read the Change Log. Read about getting the latest releases at Downloads.
You can see the variety of kinds of diagrams that you can build at GoDiagram Samples.
In the next introduction page we discuss building GoDiagram Parts and adding them into Diagrams.