Template Maps
Many of the previous examples have provided custom templates for nodes, groups, or links. Those examples have shown how to make simple adaptations of the templates for particular data instances via data binding. But what if you want to have nodes with drastically different appearances or behaviors in a single diagram at the same time?
It is possible to define a node template that includes all possible configurations for all of the kinds of nodes that you want to display. There would need to be a lot of data binding and/or code to make the needed changes. Often you will want to make not-GraphObject.Visible large parts of the template in order to make visible the one panel that you want to show. But this technique is difficult to use -- templates get way too complicated too quickly.
Instead GoDiagram supports as many templates as you want -- you choose dynamically which one you want to use to represent a particular node data. This does mean potentially a lot of templates, but each one will be much simpler, easier to write, and easier to maintain.
Each Diagram actually holds a map of templates for each type of Part: Node, Group, and Link. Each map associates a "category" name with a template. For example, when the diagram wants to create a Node for a particular node data object, the diagram uses that node data's category to look up the node template in the Diagram.NodeTemplateMap. Similar lookups are done using the Diagram.GroupTemplateMap and the Diagram.LinkTemplateMap.
Each Diagram initially has its own template maps stocked with predefined categories. The default category for any data object is the empty string, "". The Diagram.NodeTemplateMap initially contains for the empty string a very simple Node template holding a TextBlock whose TextBlock.Text property is data bound to the data converted to a string. You can see the default templates for nodes, groups, and links in a number of the previous examples, such as the Groups and Links example.
The value of Diagram.NodeTemplate is just the value of diagram.NodeTemplateMap[""]. Setting Diagram.NodeTemplate just replaces the
template in Diagram.NodeTemplateMap
named with the empty string.
The implementations of all predefined templates are provided in Templates.cs in the Extensions directory. You may wish to copy and adapt these definitions when creating your own templates.
Example of Node templates
  // the "simple" template just shows the key string and the color in the background,
  // but it also includes a tooltip that shows the description
  var simpletemplate =
    new Node("Auto") {
        ToolTip =
          Builder.Make<Adornment>("ToolTip")
            .Add(new TextBlock { Margin = 4 }.Bind("Text", "Desc"))
      }
      .Add(
        new Shape("Ellipse").Bind("Fill", "Color"),
        new TextBlock().Bind("Text", "Key")
      );

  // the "detailed" template shows all of the information in a Table Panel
  var detailtemplate =
    new Node("Auto")
      .Add(
        new Shape("RoundedRectangle").Bind("Fill", "Color"),
        new Panel("Table") { DefaultAlignment = Spot.Left }
          .Add(
            new TextBlock { Row = 0, Column = 0, ColumnSpan = 2, Font = new Font("Microsoft Sans Serif", 15, FontWeight.Bold) }
              .Bind("Text", "Key"),
            new TextBlock("Description:") { Row = 1, Column = 0 },
            new TextBlock { Row = 1, Column = 1 }.Bind("Text", "Desc"),
            new TextBlock("Color:") { Row = 2, Column = 0 },
            new TextBlock { Row = 2, Column = 1 }.Bind("Text", "Color")
          )
      );

  // create the nodeTemplateMap, holding three node templates:
  var templmap = new Dictionary<string, Part>();
  // for each of the node categories, specify which template to use
  templmap.Add("simple", simpletemplate);
  templmap.Add("detailed", detailtemplate);
  // for the default category, "", use the same template that Diagrams use by default;
  // this just shows the key value as a simple TextBlock
  templmap.Add("", diagram.NodeTemplate);

  diagram.NodeTemplateMap = templmap;

  diagram.Model =
    new MyModel {
      NodeDataSource = new List<NodeData> {
        new NodeData { Key = "Alpha", Desc = "first letter", Color = "green" },  // uses default category: ""
        new NodeData { Key = "Beta", Desc = "second letter", Color = "lightblue", Category = "simple" },
        new NodeData { Key = "Gamma", Desc = "third letter", Color = "pink", Category = "detailed" },
        new NodeData { Key = "Delta", Desc = "fourth letter", Color = "cyan", Category = "detailed" }
      }
    };
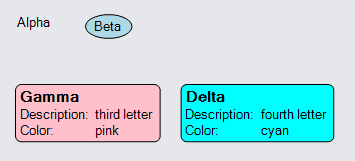
If you were to hover the mouse over the "Beta" node, you would see the tooltip showing the description string. The detailed template does not bother using tooltips to show extra information because everything is already shown.
By default the way that the model and diagram know about the category of a node data or a link data is by looking at its category property. If you want to use a different property on the data, for example because you want to use the category property to mean something different, set Model.NodeCategoryProperty to be the name of the property that results in the actual category string value. Or set Model.NodeCategoryProperty to be the empty string to cause all nodes to use the default node template.
Example of Item Templates
For Panels with a value for Panel.ItemList, there is also the Panel.ItemTemplateMap. As with Nodes and Groups and Links, the Panel.ItemTemplate is just a reference to the template named with the empty string in the Panel.ItemTemplateMap. Similarly, the Panel.ItemCategoryProperty names the property on the item data that identifies the template to use from the ItemTemplateMap.
var writeLine = new Action<InputEvent, GraphObject>((e, obj) => { // here obj will be the item Panel
var node = obj.Part;
var but = obj as Panel;
Console.WriteLine((node.Data as NodeData).Key + ": " + (but.Data as ItemData).Text);
});
// create a template map for items
var itemtemplates = new Dictionary<string, Panel> {
{
"text",
new Panel().Add(new TextBlock().Bind("Text"))
},
{
"button",
Builder.Make<Panel>("Button")
.Add(new TextBlock().Bind("Text"))
// convert a function name into a function value,
// because functions cannot be represented in JSON format
.Bind("Click", "Handler", name => {
if ((string)name == "write") return writeLine;
return null;
})
}
};
diagram.NodeTemplate =
new Node("Vertical")
.Add(
new TextBlock().Bind("Text", "Key"),
new Panel("Auto")
.Add(
new Shape { Fill = "white" },
new Panel("Vertical") {
Margin = 3,
DefaultAlignment = Spot.Left,
ItemCategoryProperty = "Type", // this property controls the template used
ItemTemplateMap = itemtemplates // map was defined above
}
.Bind("ItemList", "Info")
)
);
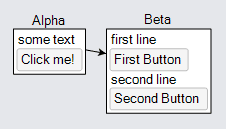
diagram.Model =
new MyModel {
NodeDataSource = new List<NodeData> {
new NodeData {
Key = "Alpha",
Info = new List<ItemData> {
new ItemData { Type = "text", Text = "some text" },
new ItemData { Type = "button", Text = "Click me!", Handler = "write" }
}
},
new NodeData {
Key = "Beta",
Info = new List<ItemData> {
new ItemData { Type = "text", Text = "first line" },
new ItemData { Type = "button", Text = "First Button", Handler = "write" },
new ItemData { Type = "text", Text = "second line" },
new ItemData { Type = "button", Text = "Second Button", Handler = "write" },
}
}
},
LinkDataSource = new List<LinkData> {
new LinkData { From = "Alpha", To = "Beta" }
}
};
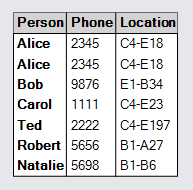
Example of Table Header Showing Item Data
The natural way to have a distinct header for a Table Panel is to have the first row (i.e. the first item) hold the data for the header, but have it be styled differently. In this example we define a "Header" item template in the Panel.ItemTemplateMap.
  var itemTemplateMap = new Dictionary<string, Panel> {
    {
      "",
      new Panel("TableRow")
        .Add(
          new TextBlock { Column = 0, Margin = 2, Font = new Font("Microsoft Sans Serif", 13, FontWeight.Bold) }
            .Bind("Text", "Name"),
          new TextBlock { Column = 1, Margin = 2 }
            .Bind("Text", "Phone"),
          new TextBlock { Column = 2, Margin = 2 }
            .Bind("Text", "Loc")
        )
    },
    {
      "Header",
      new Panel("TableRow")
        .Add(
          new TextBlock { Column = 0, Margin = 2, Font = new Font("Microsoft Sans Serif", 13, FontWeight.Bold) }
            .Bind("Text", "Name"),
          new TextBlock { Column = 1, Margin = 2, Font = new Font("Microsoft Sans Serif", 13, FontWeight.Bold) }
            .Bind("Text", "Phone"),
          new TextBlock { Column = 2, Margin = 2, Font = new Font("Microsoft Sans Serif", 13, FontWeight.Bold) }
            .Bind("Text", "Loc")
        )
    }
  };

  diagram.NodeTemplate =
    new Node("Auto")
      .Add(
        new Shape { Fill = "white" },
        new Panel("Table") {
            DefaultAlignment = Spot.Left,
            DefaultColumnSeparatorStroke = "black",
            ItemTemplateMap = itemTemplateMap
          }
          .Bind("ItemList", "People")
          .Add(
            new RowDefinition { Row = 0, Background = "lightgray" },
            new RowDefinition { Row = 1, SeparatorStroke = "black" }
          )
      );

  diagram.Model =
    new MyModel {
      NodeDataSource = new List<NodeData> {
        new NodeData {
          Key = "Group1",
          People = new List<PersonData> {
            new PersonData { Name = "Person", Phone = "Phone", Loc = "Location", Category = "Header" },
            new PersonData { Name = "Alice", Phone = "2345", Loc = "C4-E18" },
            new PersonData { Name = "Alice", Phone = "2345", Loc = "C4-E18" },
            new PersonData { Name = "Bob", Phone = "9876", Loc = "E1-B34" },
            new PersonData { Name = "Carol", Phone = "1111", Loc = "C4-E23" },
            new PersonData { Name = "Ted", Phone = "2222", Loc = "C4-E197" },
            new PersonData { Name = "Robert", Phone = "5656", Loc = "B1-A27" },
            new PersonData { Name = "Natalie", Phone = "5698", Loc = "B1-B6" }
          }
        }
      }
    };
If you do not want to have the header data in the ItemList, and you want to define the header in the node template rather than as an item template, see the example in Item Arrays.
Changing category of a Part
To change the representation of a data object, call Model.SetCategoryForNodeData or GraphLinksModel.SetCategoryForLinkData. (If you set the Part.Category of a data bound Part, it will call the Model method for you.) This causes the diagram to discard any existing Part for the data and re-create it using the new template that is associated with the new category value.
  // this function changes the category of the node data to cause the Node to be replaced
  var changeCategory = new Action<InputEvent, GraphObject>((e, obj) => {
    var node = obj.Part;
    if (node != null) {
      var diagram = node.Diagram;
      diagram.Commit(d => {
        var cat = d.Model.GetCategoryForNodeData(node.Data);
        if (cat == "simple")
          cat = "detailed";
        else
          cat = "simple";
        diagram.Model.SetCategoryForNodeData(node.Data, cat);
      }, "change category");
    }
  });

  // the "simple" template just shows the key string and the color in the background,
  // There is a Button to invoke the changeCategory function.
  var simpletemplate =
    new Node("Spot")
      .Add(
        new Panel("Auto")
          .Add(
            new Shape("Ellipse").Bind("Fill", "Color"),
            new TextBlock().Bind("Text", "Key")
          ),
        Builder.Make<Panel>("Button")
          .Set(new {
            Alignment = Spot.TopRight,
            Click = changeCategory
          })
          .Add(new Shape("AsteriskLine") { Width = 8, Height = 8 })
      );

  // the "detailed" template shows all of the information in a Table Panel
  var detailtemplate =
    new Node("Spot")
      .Add(
        new Panel("Auto")
          .Add(
            new Shape("RoundedRectangle").Bind("Fill", "Color"),
            new Panel("Table") { DefaultAlignment = Spot.Left }
              .Add(
                new TextBlock { Row = 0, Column = 0, ColumnSpan = 2, Font = new Font("Microsoft Sans Serif", 15, FontWeight.Bold) }
                  .Bind("Text", "Key"),
                new TextBlock("Description:") { Row = 1, Column = 0 },
                new TextBlock { Row = 1, Column = 1 }.Bind("Text", "Desc"),
                new TextBlock("Color:") { Row = 2, Column = 0 },
                new TextBlock { Row = 2, Column = 1 }.Bind("Text", "Color")
              )
          ),
        Builder.Make<Panel>("Button")
          .Set(new {
            Alignment = Spot.TopRight,
            Click = changeCategory
          })
          .Add(new Shape("AsteriskLine") { Width = 8, Height = 8 })
      );


  // create the nodeTemplateMap, holding three node templates:
  var templmap = new Dictionary<string, Part> {
    // for each of the node categories, specify which template to use
    { "simple", simpletemplate },
    { "detailed", detailtemplate },
    // for the default category, "", use the same template that Diagrams use by default;
    // this just shows the key value as a simple TextBlock
    { "", diagram.NodeTemplate }
  };
  diagram.NodeTemplateMap = templmap;

  diagram.Layout = new TreeLayout();

  diagram.Model =
    new MyModel {
      NodeDataSource = new List<NodeData> {
        new NodeData { Key = "Beta", Desc = "second letter", Color = "lightblue", Category = "simple" },
        new NodeData { Key = "Gamma", Desc = "third letter", Color = "pink", Category = "detailed" },
        new NodeData { Key = "Delta", Desc = "fourth letter", Color = "cyan", Category = "detailed" }
      },
      LinkDataSource = new List<LinkData> {
        new LinkData { From = "Beta", To = "Gamma" },
        new LinkData { From = "Gamma", To = "Delta" }
      }
    };
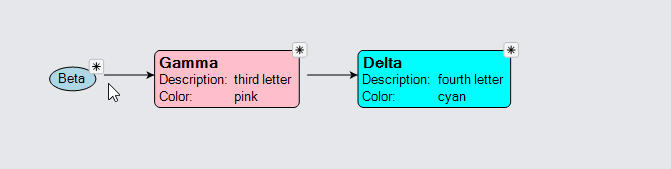
Clicking on the "asterisk" button on any node to toggles dynamically between the "simple" and the "detailed" category for each node.
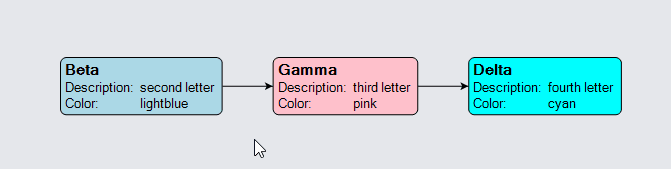
Changing template maps
You can also replace one or all of the diagram's template maps (e.g. Diagram.NodeTemplateMap) in order to discard and re-create all of the nodes in the diagram. If you are only using the default template for nodes, you would only need to replace the Diagram.NodeTemplate.
One common circumstance for doing this is as the Diagram.Scale changes. When the user zooms out far enough, there is no point in having too much detail about each of the nodes.
If you zoom out in this example, the DiagramEvent listener will detect when the Diagram.Scale becomes small enough to use the simpler template for all of the nodes. Zoom in again and suddenly it uses the more detailed template.
  // the "simple" template just shows the key string and the color in the background
  var simpletemplate =
    new Node("Auto")
      .Add(
        new Shape("Ellipse").Bind("Fill", "Color"),
        new TextBlock().Bind("Text", "Key")
      );

  // the "detailed" template shows all of the information in a Table Panel
  var detailtemplate =
    new Node("Auto")
      .Add(
        new Shape("RoundedRectangle").Bind("Fill", "Color"),
        new Panel("Table") { DefaultAlignment = Spot.Left }
          .Add(
            new TextBlock { Row = 0, Column = 0, ColumnSpan = 2, Font = new Font("Microsoft Sans Serif", 15, FontWeight.Bold) }
              .Bind("Text", "Key"),
            new TextBlock("Description:") { Row = 1, Column = 0 },
            new TextBlock { Row = 1, Column = 1 }.Bind("Text", "Desc"),
            new TextBlock("Color:") { Row = 2, Column = 0 },
            new TextBlock { Row = 2, Column = 1 }.Bind("Text", "Color")
          )
      );

  // initially use the detailed templates
  diagram.NodeTemplate = detailtemplate;

  diagram.Layout = new TreeLayout();

  diagram.Model =
    new MyModel {
      NodeDataSource = new List<NodeData> {
        new NodeData { Key = "Beta", Desc = "second letter", Color = "lightblue" },
        new NodeData { Key = "Gamma", Desc = "third letter", Color = "pink" },
        new NodeData { Key = "Delta", Desc = "fourth letter", Color = "cyan" }
      },
      LinkDataSource = new List<LinkData> {
        new LinkData { From = "Beta", To = "Gamma" },
        new LinkData { From = "Gamma", To = "Delta" }
      }
    };

  diagram.ViewportBoundsChanged += (s, e) => {
    if (diagram.Scale < 0.9) {
      diagram.NodeTemplate = simpletemplate;
    } else {
      diagram.NodeTemplate = detailtemplate;
    }
  };
Caution: if you modify a template map, there is no notification that the map has changed. You will need to call Diagram.RebuildParts explicitly. If you are replacing the Diagram.NodeTemplate or the Diagram.NodeTemplateMap or the corresponding properties for Groups or Links, the Diagram property setters will automatically call Diagram.RebuildParts.
When one or more templates are replaced in a diagram, layouts are automatically performed again.