Trees and TreeLayout
There is no limit to the kinds of graphs that you can build in GoDiagram. But the most common kind of graph forms a "tree". A tree is a graph where each node may have at most one "tree parent" and at most one link connecting to that parent node, and where there are no cycles within the graph.
Because trees occur so frequently in diagrams, there is also a tree layout that offers many customizations specifically for trees.
Manual layout of a tree structure
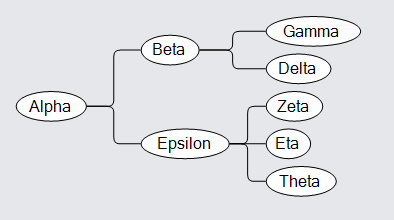
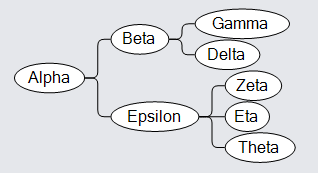
You can of course position the nodes manually, either by hand or programmatically. In this first example, the node locations are stored in the node data, and there is a Binding of Part.Location to the node data property.
  // define a simple Node template
  diagram.NodeTemplate =
    new Node("Auto")
      .Bind("Location", "Loc", Point.Parse)
      .Add(
        new Shape("Ellipse") { Fill = "white" },
        new TextBlock().Bind("Text", "Key")
      );

  diagram.LinkTemplate =
    new Link { Routing = LinkRouting.Orthogonal, Corner = 5 }
      .Add(new Shape());

  // create the model data that will be represented by Nodes and Links
  diagram.Model =
    new MyModel {
      NodeDataSource = new List<NodeData> {
        new NodeData { Key = "Alpha", Loc = "0 60" },
        new NodeData { Key = "Beta", Loc = "100 15" },
        new NodeData { Key = "Gamma", Loc = "200 0" },
        new NodeData { Key = "Delta", Loc = "200 30" },
        new NodeData { Key = "Epsilon", Loc = "100 90" },
        new NodeData { Key = "Zeta", Loc = "200 60" },
        new NodeData { Key = "Eta", Loc = "200 90" },
        new NodeData { Key = "Theta", Loc = "200 120" }
      },
      LinkDataSource = new List<LinkData> {
        new LinkData { From = "Alpha", To = "Beta" },
        new LinkData { From = "Beta", To = "Gamma" },
        new LinkData { From = "Beta", To = "Delta" },
        new LinkData { From = "Alpha", To = "Epsilon" },
        new LinkData { From = "Epsilon", To = "Zeta" },
        new LinkData { From = "Epsilon", To = "Eta" },
        new LinkData { From = "Epsilon", To = "Theta" }
      }
    };
You can also get the same results by using a TreeModel.
  diagram.NodeTemplate =
    new Node("Auto")
      .Bind("Location", "Loc", Point.Parse)
      .Add(
        new Shape("Ellipse") { Fill = "white" },
        new TextBlock().Bind("Text", "Key")
      );

  diagram.LinkTemplate =
    new Link { Routing = LinkRouting.Orthogonal, Corner = 5 }
      .Add(new Shape());

  // create the model data that will be represented by Nodes and Links
  diagram.Model =
    new MyTreeModel {
      NodeDataSource = new List<TreeData> {
        new TreeData { Key = "Alpha", Loc = "0 60" },
        new TreeData { Key = "Beta", Loc = "100 15", Parent = "Alpha" },
        new TreeData { Key = "Gamma", Loc = "200 0", Parent = "Beta" },
        new TreeData { Key = "Delta", Loc = "200 30", Parent = "Beta" },
        new TreeData { Key = "Epsilon", Loc = "100 90", Parent = "Alpha" },
        new TreeData { Key = "Zeta", Loc = "200 60", Parent = "Epsilon" },
        new TreeData { Key = "Eta", Loc = "200 90", Parent = "Epsilon" },
        new TreeData { Key = "Theta", Loc = "200 120", Parent = "Epsilon" }
      }
    };
Automatic TreeLayout
It is most common to use TreeLayout for laying out trees. Just assign Diagram.Layout to a new instance of TreeLayout. This example also
defines the setupTree function that is used in later examples on this page.
  private void SetupTree() {
    diagram.NodeTemplate =
      new Node("Auto")
        .Bind("Location", "Loc", Point.Parse)
        .Add(
          new Shape("Ellipse") { Fill = "white" },
          new TextBlock().Bind("Text", "Key")
        );

    diagram.LinkTemplate =
      new Link { Routing = LinkRouting.Orthogonal, Corner = 5 }
        .Add(new Shape());

    diagram.Model =
      new MyTreeModel {
        NodeDataSource = new List<TreeData> {
          new TreeData { Key = "Alpha" },
          new TreeData { Key = "Beta", Parent = "Alpha" },
          new TreeData { Key = "Gamma", Parent = "Beta" },
          new TreeData { Key = "Delta", Parent = "Beta" },
          new TreeData { Key = "Epsilon", Parent = "Alpha" },
          new TreeData { Key = "Zeta", Parent = "Epsilon" },
          new TreeData { Key = "Eta", Parent = "Epsilon" },
          new TreeData { Key = "Theta", Parent = "Epsilon" }
        }
      };
  }
  SetupTree();
  // automatic tree layout
  diagram.Layout = new TreeLayout();
Common TreeLayout properties
The TreeLayout.Angle property controls the general direction of tree growth. This must be zero (towards the right), 90 (downward), 180 (leftward), or 270 (upward).
  SetupTree();
  diagram.Layout = new TreeLayout { Angle = 90 };
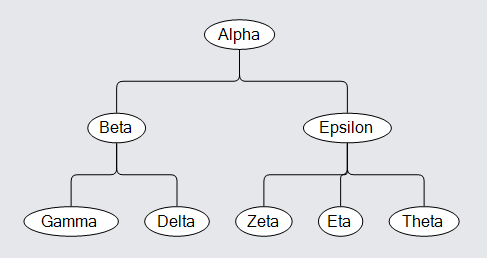
The SetupTree method was defined above.
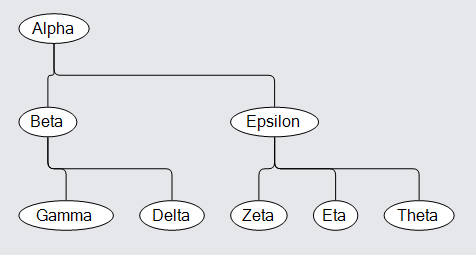
The TreeLayout.Alignment property controls how the parent node is positioned relative to its children. This must be one of the TreeAlignment values.
  SetupTree();
  diagram.Layout = new TreeLayout { Angle = 90, Alignment = TreeAlignment.Start };
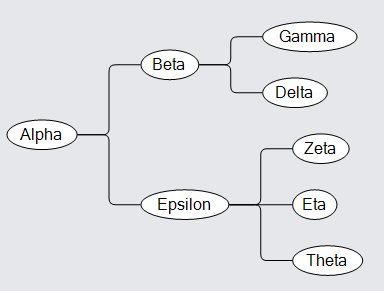
For tree layouts, all of the nodes are placed into "layers" according to the length of the chain of links from the root node. These layers are not to be confused with Diagram Layers, which control the Z-ordering of the nodes. The TreeLayout.LayerSpacing property controls how close the layers are to each other. The TreeLayout.NodeSpacing property controls how close nodes are to each other in the same layer.
  SetupTree();
  diagram.Layout = new TreeLayout { LayerSpacing = 20, NodeSpacing = 0 };
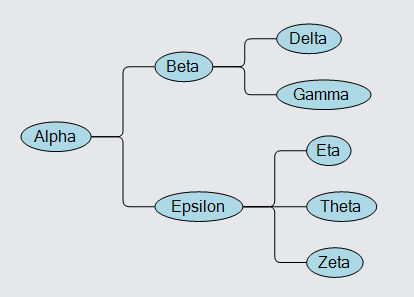
The children of each node can be sorted. By default the TreeLayout.Comparer function compares the Part.Text property. So if that property is data bound by the node template, and if you set the TreeLayout.Sorting property to sort in either ascending or descending order, each parent node will have all of its children sorted in that order by their text strings. (In this example that means alphabetical ordering of the English names of the letters of the Greek alphabet.)
  SetupTree();
  diagram.NodeTemplate =
    new Node("Auto")
      .Bind("Text", "Key")  // bind Part.Text to support sorting
      .Add(
        new Shape("Ellipse") { Fill = "lightblue" },
        new TextBlock().Bind("Text", "Key")
      );
  diagram.Layout = new TreeLayout { Sorting = TreeSorting.Ascending };
But you can provide your own function for ordering the children, such as:
  int IndexCompare(TreeVertex a, TreeVertex b) {
    var av = (a.Node.Data as TreeData).Index;
    var bv = (b.Node.Data as TreeData).Index;
    if (av < bv) return -1;
    if (av > bv) return 1;
    return 0;
  }

  diagram.Layout = new TreeLayout {
    Sorting = TreeSorting.Ascending,
    Comparer = IndexCompare
  };