Pictures
Use the Picture class to display images. The most common usage is to set the Picture.Source property with a path string, along with the GraphObject.DesiredSize or the GraphObject.Width and GraphObject.Height.
The source string will vary based on platform, and could be a web URL, a local file path, or some kind of application resource.
In these simplistic demonstrations, the code programmatically creates a Part and adds it to the Diagram. Once you learn about models and data binding you will generally not create parts (nodes or links) programmatically.
  diagram.Add(
    new Part()
      .Add(
        new Picture("Images/100x65.png")
      )
  );

However for more sophisticated control you can set the Picture.Element to an ImageElement.
Sizing
If you do not set the GraphObject.DesiredSize of a Picture, it will get the picture's natural size. But when you set the DesiredSize to be something different than the natural size, the picture may be stretched or compressed to fit.
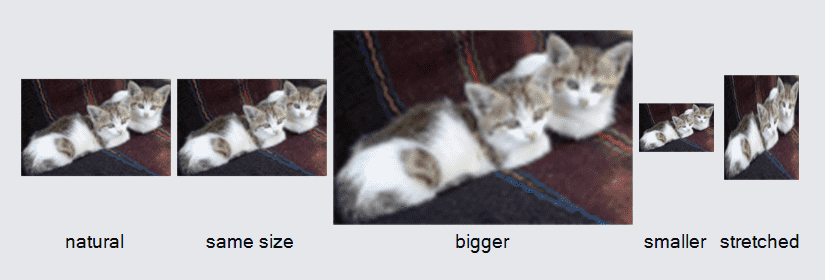
The following pictures all show a picture of kittens that is 100x65 pixels.
- The first picture shows the image at its natural size.
- The second picture also shows the image at its natural size, but has its DesiredSize set explicitly.
- The third picture increases the size of the Picture, causing the image to be expanded evenly.
- The fourth picture squeezes the 100x65 image into a 50x32.5 space -- half size. This also maintains the original aspect ratio of the image.
- The last picture sets the picture size to be 50x70, which changes the aspect ratio to be taller and thinner than the original.
  diagram.Add(
    new Part("Table")
      .Add(
        new Picture {
          Source = "Images/100x65.png", Column = 0,
          Margin = 2
        },
        new TextBlock("natural") { Row = 1, Column = 0 },
        new Picture {
          Source = "Images/100x65.png", Column = 1,
          Width = 100, Height = 65, Margin = 2
        },
        new TextBlock("same size") { Row = 1, Column = 1 },
        new Picture {
          Source = "Images/100x65.png", Column = 2,
          Width = 200, Height = 130, Margin = 2
        },
        new TextBlock("bigger") { Row = 1, Column = 2 },
        new Picture {
          Source = "Images/100x65.png", Column = 3,
          Width = 50, Height = 32.5, Margin = 2
        },
        new TextBlock("smaller") { Row = 1, Column = 3 },
        new Picture {
          Source = "Images/100x65.png", Column = 4,
          Width = 50, Height = 70, Margin = 2
        },
        new TextBlock("stretched") { Row = 1, Column = 4 }
      )
  );
Note that it may take a while for the media to load. Until the time that the media has loaded sufficiently to know its natural size, the Picture may have the wrong size, such as 0x0. We recommend that you specify the DesiredSize (or width and height) so that the Panel(s) holding the Picture will not have to rearrange themselves once the media has loaded.
However for the times when you cannot know the natural size ahead of time, there are alternative ways of stretching images to fit in a given space.
Image Stretch
Instead of always stretching or compressing to fill the DesiredSize, you can set the Picture.ImageStretch property to control the size and aspect ratio of the drawn image.
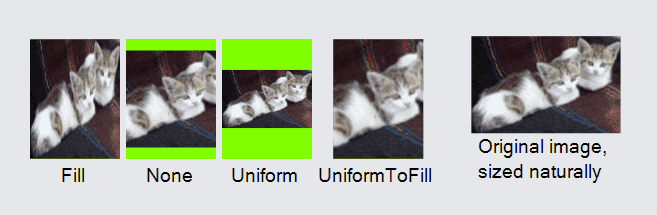
The following pictures demonstrate the four possible values for Picture.ImageStretch. All four Pictures here have the size 60x80 and show the same 100x65 PNG file. The Pictures also have a light green background, to show the space available that may be left unused, but is still part of the Picture's bounds.
- The first picture demonstrates the default behavior, to stretch in both directions. Note how the image is distorted to be narrower than it should be. However, all of the image is shown. Because the image fills the whole area and the image is not translucent, the background color does not show anywhere.
- You can see in the second picture, using an ImageStretch of ImageStretch.None, how it only shows a fraction of the whole kitten image. Because the DesiredSize is smaller than the natural size of the image, parts of the image are clipped.
- The third picture shows how a ImageStretch.Uniform will make sure that all of the image is shown, at the expense of reducing the scale and leaving some empty space at the sides or at the top and bottom. In this case, because the natural image aspect ratio is wider than the available 60x80 aspect ratio, the empty space will be at the top and bottom.
- The fourth picture shows how a ImageStretch.UniformToFill will ensure that the whole area is occupied with image, but that not all of the image is shown, since some may be clipped at the sides or at the top and bottom. Such images normally have a larger scale than when using Uniform ImageStretch. In this case what must be clipped is at the sides of the image.
- Finally there is a separate Part containing the original image, sized naturally, for comparison.
  diagram.Add(
    new Part("Table")
      .Add(
        new Picture("Images/100x65.png") {
          Column = 0, Width = 60, Height = 80, Margin = 2, Background = "chartreuse",
          ImageStretch = ImageStretch.Fill
        },
        new TextBlock("Fill") { Row = 1, Column = 0 },
        new Picture("Images/100x65.png") {
          Column = 1, Width = 60, Height = 80, Margin = 2, Background = "chartreuse",
          ImageStretch = ImageStretch.None
        },
        new TextBlock("None") { Row = 1, Column = 1 },
        new Picture("Images/100x65.png") {
          Column = 2, Width = 60, Height = 80, Margin = 2, Background = "chartreuse",
          ImageStretch = ImageStretch.Uniform
        },
        new TextBlock("Uniform") { Row = 1, Column = 2 },
        new Picture("Images/100x65.png") {
          Column = 3, Width = 60, Height = 80, Margin = 2, Background = "chartreuse",
          ImageStretch = ImageStretch.UniformToFill
        },
        new TextBlock("UniformToFill") { Row = 1, Column = 3 }
      )
  );

  // The original image sized naturally, for comparison
  diagram.Add(
    new Part("Vertical")
      .Add(
        new Picture("Images/100x65.png"),
        new TextBlock("Original image,\nsized naturally")
      )
  );
When images are clipped you can control what part of the image is drawn by using the Picture.ImageAlignment property.
Clipping
If you have a Picture that must be clipped to a geometry, such as to produce a circular image, there are two options. The first is to use a "frame" geometry to hide part of the image. Typically this frame is the same color as the Diagram background or the background of the Node. This method does not change the area of the Picture, does not allow for true transparency, and clicking anywhere in the bounds will always pick the picture.
A second method uses Panel.IsClipping. This property on a "Spot" Panel allows the filled area of the main Shape to serve as a clipping region instead of a drawn shape. This method does not change the area of the Picture, but does allow for transparency It affects object picking so that only the resultant drawn area is pickable; areas of the image that are not drawn cannot be "hit".
Examples of both follow:
  diagram.Layout = new GridLayout();

  // Using a black "frame" geometry to hide part of the image.
  // Typically this frame is the same color as the Diagram background or the background of the Node.
  diagram.Add(
    new Part("Spot") { Scale = 2 }
      .Add(
        new Picture("Images/55x55.png") {
          Name = "Picture",
          DesiredSize = new Size(55, 55),
          Background = "red"
        },
        new Shape {
          StrokeWidth = 0, Stroke = null, Fill = "black",
          GeometryString = "f M0 0 L100 0 L100 100 L0 100 z M5,50a45,45 0 1,0 90,0a45,45 0 1,0 -90,0 z",
          Width = 56, Height = 56
        }
      )
  );

  // Using Panel.IsClipping
  diagram.Add(
    new Part("Spot") { IsClipping = true, Scale = 2 }
      .Add(
        new Shape("Circle") { Width = 55, StrokeWidth = 0 },
        new Picture("Images/55x55.png") { Width = 55, Height = 55 }
      )
  );

  // Using Panel.IsClipping and also having a surrounding panel
  diagram.Add(
    new Part("Spot") { Scale = 2 }
      .Add(
        new Shape("Circle") { Width = 65, StrokeWidth = 0, Fill = "red" },
        new Panel("Spot") { IsClipping = true }
          .Add(
            new Shape("Circle") { Width = 55, StrokeWidth = 0 },
            new Picture("Images/55x55.png") { Width = 55, Height = 55 }
          )
      )
  );

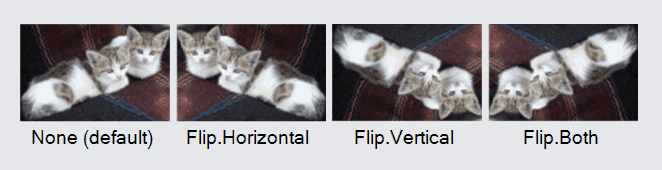
Flipping
You can flip image sources horizontally and vertically with the Picture.Flip property:
  diagram.Add(
    new Part("Table")
      .Add(
        new Picture {
          Source = "Images/100x65.png", Column = 0, Margin = 2,
          Flip = Flip.None
        },
        new TextBlock("None (default)") { Row = 1, Column = 0 },
        new Picture {
          Source = "Images/100x65.png", Column = 1, Margin = 2,
          Flip = Flip.Horizontal
        },
        new TextBlock("Flip.Horizontal") { Row = 1, Column = 1 },
        new Picture {
          Source = "Images/100x65.png", Column = 2, Margin = 2,
          Flip = Flip.Vertical
        },
        new TextBlock("Flip.Vertical") { Row = 1, Column = 2 },
        new Picture {
          Source = "Images/100x65.png", Column = 3, Margin = 2,
          Flip = Flip.Both
        },
        new TextBlock("Flip.Both") { Row = 1, Column = 3 }
      )
  );