Selection
Users normally select Parts manually by clicking on them and they deselect them by clicking in the background or pressing the Esc key. You can select parts programmatically by setting Part.IsSelected.
Users can also drag in the background in order to select the Parts that are within a rectangular area, via the DragSelectingTool. Read more about that in the Introduction to Tools at DragSelectingTool.
The Diagram keeps a collection of selected parts, Diagram.Selection. That collection is read-only -- the only way to select or deselect a Part is by setting its Part.IsSelected property. You can limit how many parts are selected by setting Diagram.MaxSelectionCount. Prevent all selection by the user by setting Diagram.AllowSelect to false. Or prevent a particular Part from being selected by setting Part.Selectable to false.
You can show that a part is selected by either or both of two general techniques: adding Adornments or changing the appearance of some of the elements in the visual tree of the selected Part.
Selection Adornments
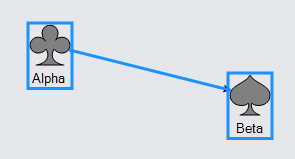
It is common to display that a Part is selected by having it show a selection Adornment when the Part is selected. For nodes this is normally a blue rectangle surrounding the whole Node. This is the default behavior; if you do not want such an adornment, you can set Part.SelectionAdorned to false.
  diagram.NodeTemplate =
    new Node() {
        // the location is the center of the Shape, not the center of the whole Node
        LocationSpot = Spot.Center, LocationElementName = "ICON"
      }
      .Bind("Location", "Loc", Point.Parse)
      .Add(
        new Shape {
            Name = "ICON",
            Width = 40, Height = 40,
            Fill = "gray",
            PortId = ""  // the port is this Shape, not the whole Node
          }
          .Bind("Figure"),
        new TextBlock { Margin = new Margin(5, 0, 0, 0) }
          .Bind("Text", "Key")
      );

  diagram.Model =
    new MyModel {
      NodeDataSource = new List<NodeData> {
        new NodeData { Key = "Alpha", Figure = "Club", Loc = "0 0" },
        new NodeData { Key = "Beta", Figure = "Spade", Loc = "200 50" }
      },
      LinkDataSource = new List<LinkData> {
        new LinkData { From = "Alpha", To = "Beta" }
      }
    };
  diagram.CommandHandler.SelectAll();
By default an Adornment will apply to the whole Node. What if you want attention to be drawn only to the main piece of a node? You can accomplish that by naming that object and setting Part.SelectionElementName to that name.
  diagram.NodeTemplate =
    new Node("Vertical") {
        // the location is the center of the Shape, not the center of the whole Node
        LocationSpot = Spot.Center, LocationElementName = "ICON",
        SelectionElementName = "ICON"  // added this property!
      }
      .Bind("Location", "Loc", Point.Parse)
      .Add(
        new Shape {
            Name = "ICON",
            Width = 40, Height = 40,
            Fill = "gray",
            PortId = ""  // the port is this Shape, not the whole Node
          }
          .Bind("Figure"),
        new TextBlock { Margin = new Margin(5, 0, 0, 0) }
          .Bind("Text", "Key")
      );

  diagram.Model =
    new MyModel {
      NodeDataSource = new List<NodeData> {
        new NodeData { Key = "Alpha", Figure = "Club", Loc = "0 0" },
        new NodeData { Key = "Beta", Figure = "Spade", Loc = "200 50" }
      },
      LinkDataSource = new List<LinkData> {
        new LinkData { From = "Alpha", To = "Beta" }
      }
    };
  diagram.Select(diagram.Nodes);
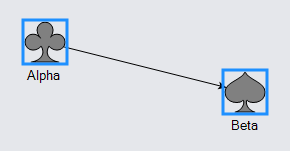
Note how the Part.SelectionElementName property is similar to the Part.LocationElementName in helping to treat a node as if only one piece of it really mattered.
Custom Selection Adornments
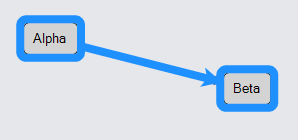
If you do want a selection adornment but want something different than the standard one, you can customize it. Such customization can be done by setting the Part.SelectionAdornmentTemplate. In this example, nodes get thick blue rounded rectangles surrounding the selected node, and links get thick blue lines following the selected link's path.
  diagram.NodeTemplate =
    new Node("Auto") {
        SelectionAdornmentTemplate =
          new Adornment("Auto")
            .Add(
              new Shape("RoundedRectangle") {
                  Fill = null, Stroke = "dodgerblue", StrokeWidth = 8
                },
              new Placeholder()
            )  // end Adornment
      }
      .Bind("Location", "Loc", Point.Parse)
      .Add(
        new Shape("RoundedRectangle") { Fill = "lightgray" },
        new TextBlock { Margin = 5 }
          .Bind("Text", "Key")
      );

  diagram.LinkTemplate =
    new Link {
        SelectionAdornmentTemplate =
          new Adornment()
            .Add(
              new Shape {
                  IsPanelMain = true, Stroke = "dodgerblue", StrokeWidth = 8
                },
              new Shape {
                  ToArrow = "Standard", Fill = "dodgerblue", Stroke = null, Scale = 2.5
                }
            )  // end Adornment
      }
      .Add(
        new Shape(),
        new Shape { ToArrow = "Standard" }
      );

  diagram.Model =
    new MyModel {
      NodeDataSource = new List<NodeData> {
        new NodeData { Key = "Alpha", Loc = "0 0" },
        new NodeData { Key = "Beta", Loc = "200 50" }
      },
      LinkDataSource = new List<LinkData> {
        new LinkData { From = "Alpha", To = "Beta" }
      }
    };
  diagram.CommandHandler.SelectAll();
Note that an Adornment is just a Part. Adornments for nodes must contain a Placeholder in their visual tree. The Placeholder gets positioned where the selected object is.
Adornments for links are assumed to be panels of Panel.Type that is PanelLayoutLink. Hence the main element may be a Shape that gets the geometry of the selected Link's path shape, and the other elements of the adornment may be positioned on or near the segments of the link route just as for a regular Link.
More Complex Adornments
The custom Adornment for a Node need not be only a simple Shape outlining the selected node. Here is an adornment that adds a button to the adornment which inserts a node and a link to that new node.
  var addNodeAndLink = new Action<InputEvent, GraphObject>((e, b) => {
    // take a button panel in an Adornment, get its Adornment, and then get its adorned Node
    var node = (b.Part as Adornment).AdornedPart;
    // we are modifying the model, so conduct a transaction
    node.Diagram.Commit(d => {
      // have the Model add the node data
      var newnode = new NodeData { Key = "N" };
      d.Model.AddNodeData(newnode);
      // locate the node initially where the parent node is
      d.FindNodeForData(newnode).Location = node.Location;
      // and then add a link data connecting the original node with the new one
      var newlink = new LinkData { From = (node.Data as NodeData).Key, To = newnode.Key };
      (d.Model as MyModel).AddLinkData(newlink);
    }, "add node and link");
  });

  diagram.NodeTemplate =
    new Node("Auto") {
        SelectionAdornmentTemplate =
          new Adornment("Spot")
            .Add(
              new Panel("Auto")
                .Add(
                  // this Adornment has a rectangular blue Shape around the selected node
                  new Shape { Fill = null, Stroke = "dodgerblue", StrokeWidth = 3 },
                  new Placeholder()
                ),
              // and this Adornment has a Button to the right of the selected node
              Builder.Make<Panel>("Button")
                .Set(new {
                  Alignment = Spot.Right, AlignmentFocus = Spot.Left,
                  Click = addNodeAndLink  // define click behavior for Button in Adornment
                })
                .Add(
                  // the Button content
                  new TextBlock("ADD") { Font = new Font("Segoe UI", 9, FontWeight.Bold) }
                )
            )  // end Adornment
      }
      .Add(
        new Shape("RoundedRectangle") { Fill = "lightgray" },
        new TextBlock { Margin = 5 }
          .Bind("Text", "Key")
      );

  diagram.Layout = new TreeLayout();

  diagram.Model =
    new MyModel {
      NodeDataSource = new List<NodeData> {
        new NodeData { Key = "Alpha" },
        new NodeData { Key = "Beta" }
      },
      LinkDataSource = new List<LinkData> {
        new LinkData { From = "Alpha", To = "Beta" }
      }
    };
  diagram.Select(diagram.FindNodeForKey("Beta"));
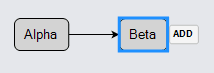
Selecting any node and click the "ADD" button automatically lays out the diagram as a tree.
Data Binding
Like all Parts, Adornments support data binding. If the adorned Part has a data binding (i.e. if Panel.Data is non-null), all adornments for that part will also be bound to the same data object.
  diagram.NodeTemplate =
    new Node("Auto") {
        SelectionAdornmentTemplate =
          new Adornment("Auto")
            .Add(
              new Shape { Fill = null, Stroke = "dodgerblue", StrokeWidth = 6 }
                .Bind("Stroke", "Color"),
              new Placeholder()
            )  // end Adornment
      }
      .Bind("Location", "Loc", Point.Parse)
      .Add(
        new Shape("RoundedRectangle") { Fill = "lightgray", StrokeWidth = 2 }
          .Bind("Stroke", "Color"),
        new TextBlock { Margin = 5 }
          .Bind("Text", "Key")
      );

  diagram.Model =
    new MyModel {
      NodeDataSource = new List<NodeData> {
        new NodeData { Key = "Alpha", Loc = "0 0", Color = "blue" },
        new NodeData { Key = "Beta", Loc = "200 50", Color = "red" }
      },
      LinkDataSource = new List<LinkData> {
        new LinkData { From = "Alpha", To = "Beta" }
      }
    };
  diagram.Select(diagram.Nodes);
Notice how each Adornment has the same color as the selected node's data.color.
Selection Appearance changes
Adding a selection adornment is not the only way to indicate visually that a Part is selected. You can also modify the appearance of one or more objects in your Part.
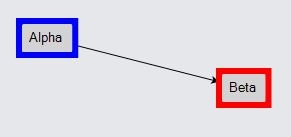
One way to do this is with data binding. Here we data bind the Shape.Fill to the Part.IsSelected property with a converter function that converts the boolean value to a color string or brush. We also turn off the regular rectangular blue selection adornment.
  diagram.NodeTemplate =
    new Node("Auto") {
        SelectionAdorned = false  // don't bother with any selection adornment
      }
      .Bind("Location", "Loc", Point.Parse)
      .Add(
        new Shape("RoundedRectangle") { Fill = "lightgray", StrokeWidth = 2 }
          // when this Part.IsSelected changes value, change this Shape.Fill value:
          .Bind(new Binding("Fill", "IsSelected", sel => {
            return (bool)sel ? "cyan" : "lightgray";
          }).OfElement("")),  // The element named "" is the root visual element, the Node itself
        new TextBlock { Margin = 5 }
          .Bind("Text", "Key")
      );

  diagram.Model =
    new MyModel {
      NodeDataSource = new List<NodeData> {
        new NodeData { Key = "Alpha", Loc = "0 0" },
        new NodeData { Key = "Beta", Loc = "200 50" }
      },
      LinkDataSource = new List<LinkData> {
        new LinkData { From = "Alpha", To = "Beta" }
      }
    };
  diagram.Select(diagram.FindNodeForKey("Beta"));
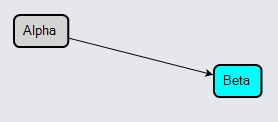
Now when you select a node its background color changes to cyan.
More generally you can execute code to modify the Part when Part.IsSelected has changed value. In this example we will have the same side effects as the previous example.
  void onSelectionChanged(Part node) {
    var icon = node.FindElement("ICON") as Shape;
    if (icon != null) {
      if (node.IsSelected)
        icon.Fill = "cyan";
      else
        icon.Fill = "lightgray";
    }
  }

  diagram.NodeTemplate =
    new Node("Auto") {
        SelectionAdorned = false,  // don't bother with any selection adornment
        SelectionChanged = onSelectionChanged  // executed when Part.IsSelected has changed
      }
      .Bind("Location", "Loc", Point.Parse)
      .Add(
        new Shape("RoundedRectangle") { Name = "ICON", Fill = "lightgray", StrokeWidth = 2 },
        new TextBlock { Margin = 5 }
          .Bind("Text", "Key")
      );

  diagram.Model =
    new MyModel {
      NodeDataSource = new List<NodeData> {
        new NodeData { Key = "Alpha", Loc = "0 0" },
        new NodeData { Key = "Beta", Loc = "200 50" }
      },
      LinkDataSource = new List<LinkData> {
        new LinkData { From = "Alpha", To = "Beta" }
      }
    };
  diagram.Select(diagram.FindNodeForKey("Beta"));
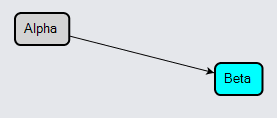
There are some restrictions on what you can do in such an event handler: you should not select or deselect any parts, and you should not add or remove any parts from the diagram.